Thank you for trying BitKeeper! The following test drive will walk you through the installation and use of BitKeeper in the day-to-day life of a developer. This test drive does not cover the more advanced topics of distributed source control but is instead meant as an introduction to living in BitKeeper.
The test drive makes it easy for you to follow along with what you should be doing by providing shell commands you should run at each step.
When you see this typeface, type the commands into your shell.
BitKeeper has both a powerful command line interface and a rich set of graphical tools. Everything can be done from the command line. We’ll show a little bit of each.
Installation
So you’re ready to try out BitKeeper? First things first, let’s make sure it’s installed on your machine. Open a terminal window and type:
$ bk version -s
7.3.3
If instead of 7.3.3 above, you get an error like:
bash: bk: command not found
It means BitKeeper is not installed on your system. Please follow the installation instructions.
Setting Up the Demo Repository
Now that you have BitKeeper installed on your system, we’re ready to try it out! For our demo, we’ll use a copy of the NTP (network time protocol) source base. Our clone of this demo resides at the URL http://bkbits.net/u/bkdemo
Cloning a Remote Repo
Let’s start by making a copy of the demo repository by cloning it from the source URL to a local directory bk_demo. Later we’ll check-in a change to a source file and pull in another clone that has a conflicting change.
$ bk clone http://bkbits.net/u/bkdemo/bk_demo bk_demo
Clone http://bkbits.net/u/bkdemo/bk_demo
   -> file:///home/lumbergh/bk_demo
clone                              100% |==============================| OK
The clone, like many bk operations, shows a progress bar as the command runs with an OK at the end to indicate success.
Your clone should look something like this:
$ ls bk_demo
adjtimed          configure.ac  libjsmn         packageinfo.sh    readme.y2kfixes
bincheck.mf       deps-ver      libntp          parseutil         results.y2kfixes
BitKeeper         depsver.mf    libparse        ports             SCCS
bootstrap         dot.emacs     Makefile.am     README            scripts
br-flock          flock-build   NEWS            README.bk         sntp
build             html          NOTES.y2kfixes  README.hackers    tests
ChangeLog         include       ntpd            README.leapsmear  TODO
check-libopts.mf  includes.mf   ntpdate         README.patches    util
clockstuff        INSTALL       ntpdc           README.refclocks  WHERE-TO-START
CommitLog-4.1.0   kernel        ntpq            README.simulator
conf              lib           ntpsnmpd        README.versions
Cloning a Local Copy
Now we’re ready to work! Our demo repo was cloned from bkbits.net, and we don’t have permission to write back to the parent repository Our next step is to make a second clone so that we can make some changes that we can push back to our first clone.
$ bk clone bk_demo bk_demo_copy
Clone file:///home/lumbergh/bk_demo
   -> file:///home/lumbergh/bk_demo_copy
clone                              100% |==============================| OK
You should now have two directories with two repos: bk_demo and bk_demo_copy. When you clone, the cloned repository remembers its parent. So bk_demo_copy knows that bk_demo is its parent, and that’s where it will pull its updates from and send its changes to by default. bk_demo knows that http://bkbits.net/u/bkdemo/bk_demo is its parent.
$ cd bk_demo
$ bk parent
Push/pull parent: http://bkbits.net/u/bkdemo/bk_demo
$ cd ../bk_demo_copy
$ bk parent
Push/pull parent: file:///home/lumbergh/bk_demo
$ cd ..
Pull Changes from a Parent
Now we have a copy to work in. But first things first. Let’s try and pull changes from our parent to make sure we have the latest code. A clone automatically pulls the latest revision of the code, and we haven’t made any changes to our parent, but we’ll do it anyway just to see what it looks like.
$ cd bk_demo_copy
$ bk pull
Pull file:///home/lumbergh/bk_demo
  -> file:///home/lumbergh/bk_demo_copy
Nothing to pull.
Now let’s pull from another repo that does have some changes in it. We’ll take a close look at those changes in a minute.
$ bk pull http://bkbits.net/u/bkdemo/bk_demo1
Pull http://bkbits.net/u/bkdemo/bk_demo1
  -> file:///home/lumbergh/bk_demo_copy
pull                                 1 changeset,   no merges in   2 files
That means we successfully pulled in a change from bk_demo1.
Making Changes
Now that we’ve pulled in a change, we’re ready to make changes of our own.
Checking out files
Let’s dig into that bk_demo_copy repo and see what we have. There is a C source file named ntp_io.c in the ntpd directory that we’ll work with.
$ ls -l ntpd/ntp_io.c
-rw-rw-r-- 1 lumbergh lumbergh 111218 Jul  7 06:07 ntpd/ntp_io.c
We’re good to go — when we cloned the demo repo, BitKeeper automatically checked out this file with read-write permissions, because the default mode for this repo is checkout:edit. Sometimes very large repos use a checkout:get mode which speeds up commits considerably but which would require us to tell BitKeeper which files we intend to change. For all but the largest repos, checkout:edit works fine. To learn more, see the note on checkout modes for extra credit.
Modifying and creating files
Now we’re ready to make a change. Let’s open up ntp_io.c in your favorite editor and add something to the printf at line 531.
Change line 531 from
        printf("addr_refid = %08x\n", itf->addr_refid);
to
        printf("addr_refid = 0x%08x (%d)\n", itf->addr_refid,
               itf->addr_refid);
Now let’s create a completely new file in our directory. Let’s create a new file called foo.c and just put a little something in there. It doesn’t matter what.
$ echo "void foo() {}" >ntpd/foo.c
Viewing Changes
Now that we’ve made a few changes to our repo, let’s take a look at those changes and see what we’ve done.
The following command shows us which files we’ve modified so far:
$ bk -Uc
ntpd/ntp_io.c
The bk command by itself is a swiss-army-knife kind of tool to list files under BK control.
The -Uc option lists changed files. That is, files that are different from the checked-in version.
So, where did foo.c go?! Well, BitKeeper doesn’t know anything about foo.c yet, so it’s not considered to be a modified file — it’s an extra.
When it comes time to commit, BitKeeper will tell us there is an extra file there it doesn’t know about and give us the option to include it then. Here’s the command to show the extra files:
$ bk -Ux
ntpd/foo.c
Of course, you can combine the options:
$ bk -Ucx
ntpd/foo.c
ntpd/ntp_io.c
Let’s look at our local diffs to verify that we changed the printf correctly:
$ bk -Uc diffs
===== ntpd/ntp_io.c 1.404 vs edited =====
--- 1.404/ntpd/ntp_io.c	  2015-07-07 05:01:38 -07:00
+++ edited/ntpd/ntp_io.c  2015-07-07 06:06:40 -07:00
@@ -528,7 +528,8 @@
   printf("phase = %u\n", itf->phase);
   printf("flags = 0x%08x\n", itf->flags);
   printf("last_ttl = %d\n", itf->last_ttl);
-  printf("addr_refid = %08x\n", itf->addr_refid);
+  printf("addr_refid = %08x (%d)\n", itf->addr_refid,
+         itf->addr_refid);
   printf("num_mcast = %d\n", itf->num_mcast);
   printf("received = %ld\n", itf->received);
   printf("sent = %ld\n", itf->sent);
The -U means to work over all user files in the repo and the -c restricts that to only the changed files.
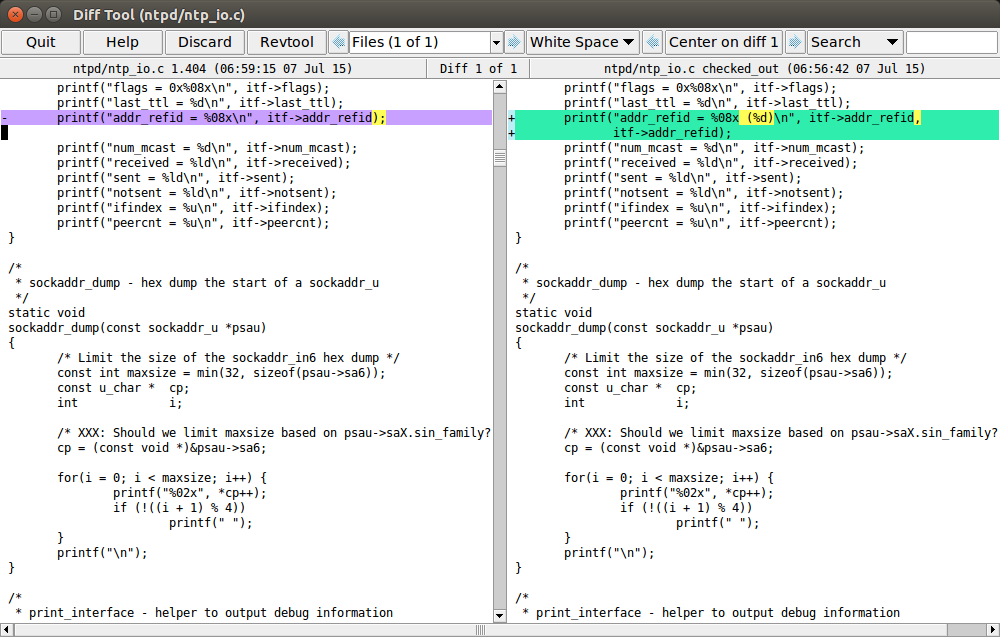
Sometimes it’s easier to view the diffs graphically:
$ bk difftool
This brings up the BK difftool that shows us side-by-side differences in BitKeeper-controlled files. It starts on the first change in the first changed file and lets you navigate from there by typing "n" or "p" to move forward or backward through the diffs:
Committing Changes
We’ve made some changes to our repo, and we’ve looked at those changes. Now we’re ready to commit our changes!
Let’s launch the BitKeeper checkin tool, known as citool, which makes it easy to see our file changes and commit them to the repository. It lists each file we changed (or added) and lets us write per-file comments, then it groups all those files together into what’s called a changeset (or cset for short). You can think of a cset as an indivisible unit of change you want to share with other people.
$ bk citool
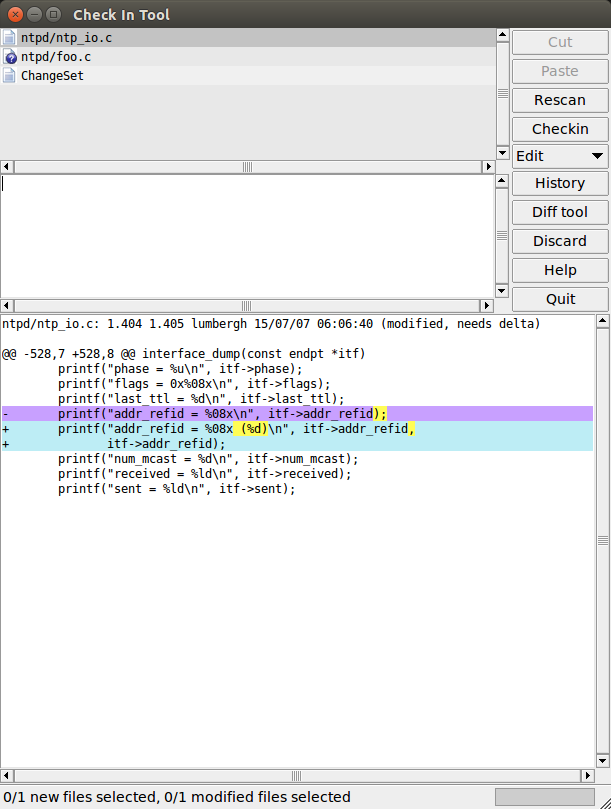
We can see in our file list that citool has found the changes we made to ntp_io.c as well as the extra foo.c file we created. Citool shows us the changes in the lower window. Citool doesn’t need to show us the entire contents of the file or its changes, it’s showing us just the differences between our current, working version and the last version committed in the repo.
We can see our change to ntp_io.c right there, and the diffs look good, so let’s give it a comment. For a little extra reading, you can read about our thoughts on commit comments. Enter any comment you want for the changes, and notice that the icon on the file shifts to a green check to show us that this file is now set to be included in our commit.
When we click on foo.c, citool sees that this is a new file and doesn’t know anything about it, so it just prints the file contents to the lower window. Citool has now marked this file to be included in our commit and has entered a default little comment about the file being new. You can change the comment if you like, or you can just leave the default new file message in there.
We have two files ready to be committed, now all we need is a ChangeSet comment. Click on the ChangeSet file and you’ll see this:
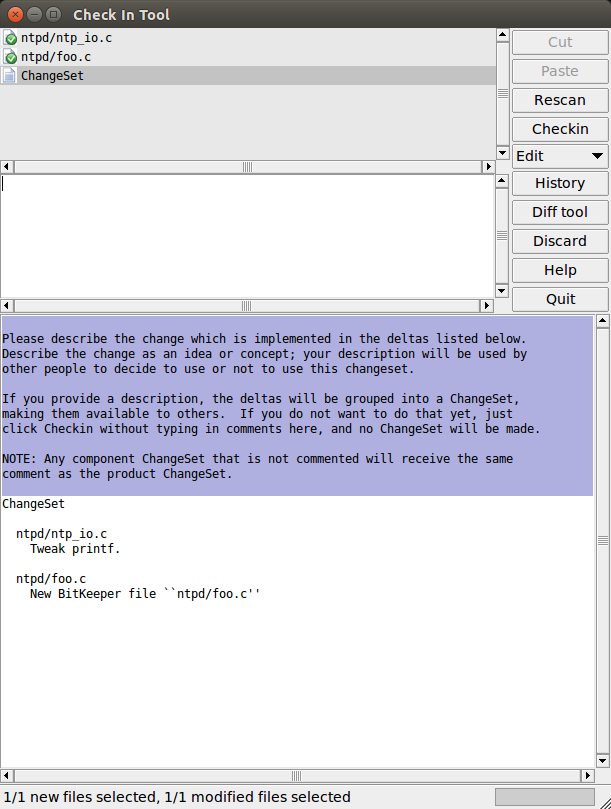
You should see the files we’re ready to commit down in the lower window along with their per-file comments. This gives you an idea of what is about to be committed with this changeset. Remember, this comment is a summary of the overall change, so it should be just a few lines describing what the change is about. Since this is just an example, you can comment it with anything you like.
Once you give the changeset a comment, you should see the green check next to the ChangeSet file, and you should now see the Checkin button has changed its text and is now labeled Commit. It should look something like this:

Click the Commit button twice to create a changeset. Citool will walk through and check in each of the files and then commit the whole thing as a changeset to our repository. Once the commit has completed with no problems, citool will automatically close.
From the command line
Let’s say you were remotely logged into your workstation via ssh and had no graphical display. No problem — it’s easy to create changesets completely from the command line. Here’s how we would have done it without running citool.
First, we tell BitKeeper to create deltas for each file we modified (and this includes telling BK about extra files we added). The -y option is how we specify comments.
$ bk delta -y'tweak printf' ntpd/ntp_io.c
ntpd/ntp_io.c revision 1.404: +2 -1 = 3432
ntpd/ntp_io.c 1.404: 4777 lines
$ bk new ntpd/foo.c
ntpd/foo.c revision 1.1: +0 -0 = 0
Now we have two deltas pending — they haven’t yet been committed to the repo — so let’s create a changeset out of them by running the commit command:
$ bk commit -y'Trying our first BK cset.'
ChangeSet revision 1.3498: +2
That’s it! There now is a new changeset in our repo and its revision number is 1.3498.
Looking at History
We’ve just committed one changeset to our repo, so let’s take a look at its revision history. BitKeeper gives you many ways to understand a repo’s history. Here we’ll show just a few, using both the command line and BitKeeper’s graphical tools.
List of Changesets
A very common thing to do in bk is to view a summary of the history from the perspective of the changesets. Looking only at the csets and not the per-file comments gives a higher-level view of what’s going on. This is where your changeset comments come in handy for browsing back through the history.
$ bk revtool
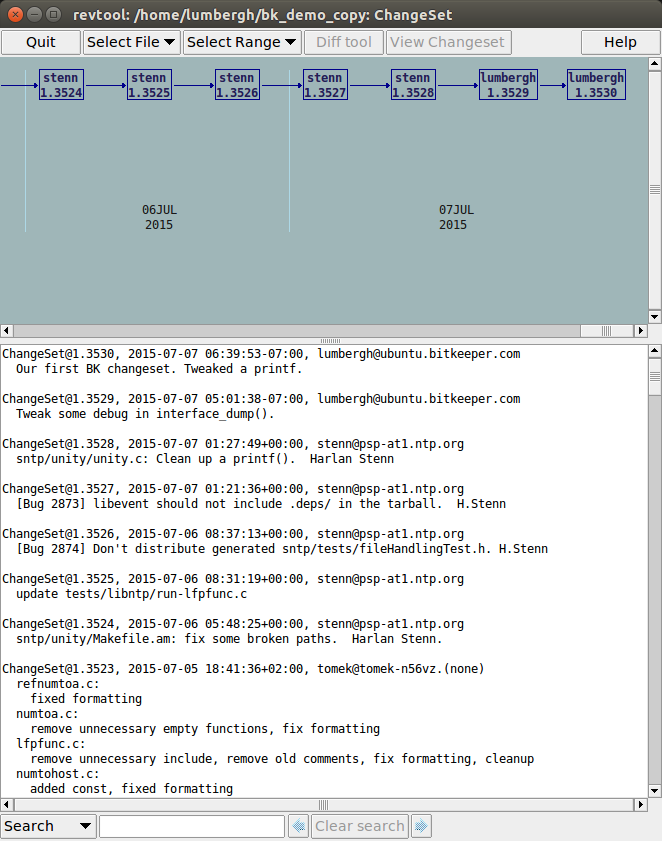
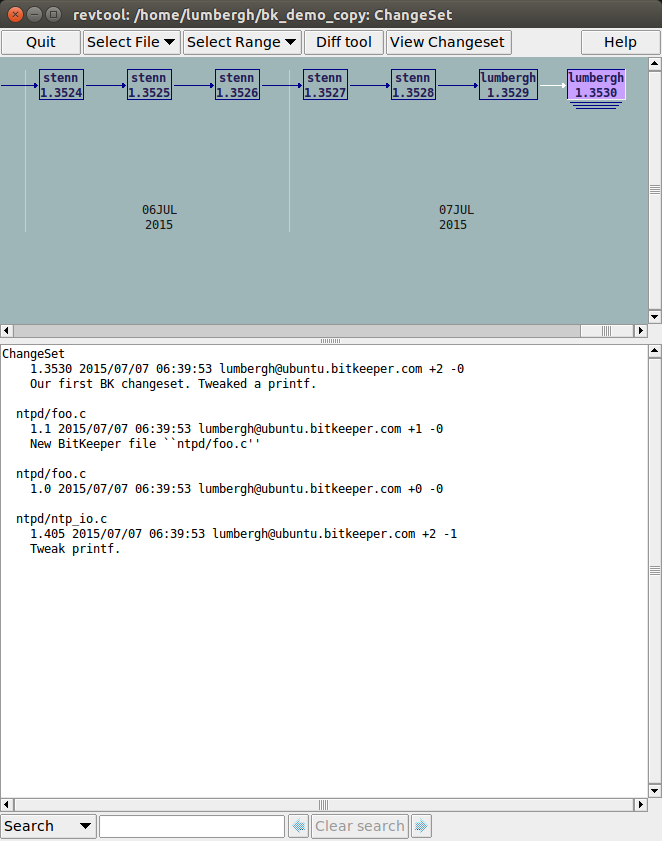
Let’s take a look at revtool and understand what it’s showing us. Revtool is arranged with a revision graph on the top and then a description window on the bottom. When revtool is given no arguments, it runs over the entire repository, showing the last 50 csets along with their descriptions down in the bottom window. You should see your new commit to the far right of the graph. You can see down in the bottom window that our last commit is on top of the history.
You can very quickly get this summary, minus the graph, from the command line using the bk changes command:
$ bk changes
ChangeSet@1.3530, 2015-07-07 06:39:53-07:00, lumbergh@ubuntu.bitkeeper.com
  Our first BK changeset. Tweaked a printf.

ChangeSet@1.3528.1.1, 2015-07-07 05:05:22-07:00, lumbergh@ubuntu.bitkeeper.com
  Add 0x to an interface_dump() printf, for bk demo.

ChangeSet@1.3529, 2015-07-07 05:01:38-07:00, lumbergh@ubuntu.bitkeeper.com
  Tweak some debug in interface_dump().

ChangeSet@1.3528, 2015-07-07 01:27:49+00:00, stenn@psp-at1.ntp.org
  sntp/unity/unity.c: Clean up a printf().  Harlan Stenn

ChangeSet@1.3527, 2015-07-07 01:21:36+00:00, stenn@psp-at1.ntp.org
  [Bug 2873] libevent should not include .deps/ in the tarball.  H.Stenn

ChangeSet@1.3526, 2015-07-06 08:37:13+00:00, stenn@psp-at1.ntp.org
  [Bug 2874] Don't distribute generated sntp/tests/fileHandlingTest.h. H.Stenn

ChangeSet@1.3525, 2015-07-06 08:31:19+00:00, stenn@psp-at1.ntp.org
  update tests/libntp/run-lfpfunc.c
Your bk changes command will print more than this, displaying a page a time, until you quit it. This command has lots of ways of displaying its output so that you can see just what you want; run bk help changes for a glimpse of what you can do.
Looking at a Changeset
Go back to revtool, or start it up like you did above if you need to, then click the last commit in the revision graph and you’ll see this:
When we select a revision in the graph, we see all of the comments for that changeset in the lower window. We can see the overall changeset comment we entered as well as the per-file comments for each file in the cset.
It’s easy to get this information from the command line, by specifying which cset revision you want details for and specifying -v to get some per-file details:
$ bk changes -r1.3530 -v
ChangeSet@1.3530, 2015-07-07 06:39:53-07:00, lumbergh@ubuntu.bitkeeper.com
  Our first BK changeset. Tweaked a printf.

  ntpd/foo.c@1.1 +1 -0
    New BitKeeper file ``ntpd/foo.c''

  ntpd/foo.c@1.0 +0 -0

  ntpd/ntp_io.c@1.405 +2 -1
    Tweak printf.
Here we can see the new foo.c file we added and its comment as well as the ntp_io.c file we changed and what our comment on that was.
Looking at a file
The comments tell us what was changed at a glance, but what if we want to see what was actually changed in the code? Now click the line below ntpd/ntp_io.c in the text window and you’ll see another revtool fire up with just that file and its history.
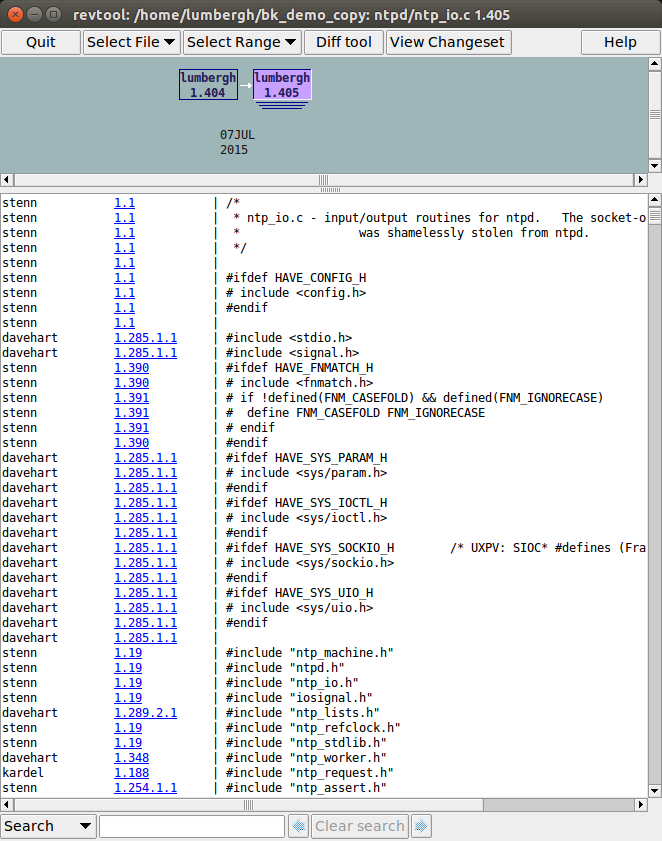
Now we are looking at revtool from the perspective of a single file, not the repo as a whole. The default is to show an annotated view of that file at its latest version. This shows us the full contents of the file with each line annotated by the revision it was first introduced as well as who made the change. We can see from our ntp_io.c file that we are currently at revision 1.404, which was our recent commit.
This view shows us the entire file, but we really just wanted to see what was changed between our recent version and the previous version. For that we just hit d to bring up the diff view.
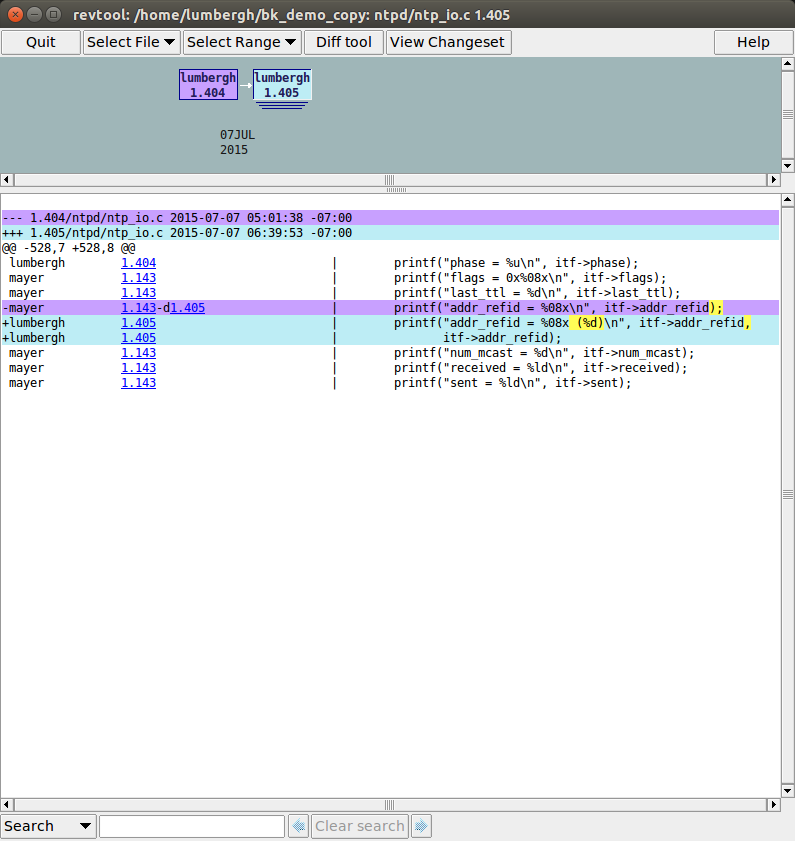
Now we are seeing the diffs of what was changed in our last commit. We added a field to a printf.
You can also click nodes in the graph to see diffs of a file.
You can select any two revisions with your mouse and see the differences between them. Select the first revision in the graph by clicking the left mouse button and then select any other revision by clicking the right mouse button. Revtool will show you the differences between those two versions.
That’s it for revtool. You can press quit in the revtool windows.
Diffs are also easy to get from the command line. Just use two -v's to bk changes:
$ bk changes -r1.3530 -vv

#### ChangeSet ####
2015-07-07 06:39:53-07:00, lumbergh@ubuntu.bitkeeper.com
  Our first BK changeset. Tweaked a printf.

==== ntpd/foo.c ====
2015-07-07 06:39:53-07:00, lumbergh@ubuntu.bitkeeper.com +1 -0
  New BitKeeper file ``ntpd/foo.c''

--- /dev/null	2015-07-04 10:31:36 -07:00
+++ 1.1/ntpd/foo.c	   2015-07-07 06:39:53 -07:00
@@ -0,0 +1 @@
+void foo() {}

==== ntpd/foo.c ====
2015-07-07 06:39:53-07:00, lumbergh@ubuntu.bitkeeper.com +0 -0

==== ntpd/ntp_io.c ====
2015-07-07 06:39:53-07:00, lumbergh@ubuntu.bitkeeper.com +2 -1
  Tweak printf.

--- 1.404/ntpd/ntp_io.c	2015-07-07 05:01:38 -07:00
+++ 1.405/ntpd/ntp_io.c	2015-07-07 06:39:53 -07:00
@@ -528,7 +528,8 @@ interface_dump(const endpt *itf)
   printf("phase = %u\n", itf->phase);
   printf("flags = 0x%08x\n", itf->flags);
   printf("last_ttl = %d\n", itf->last_ttl);
-  printf("addr_refid = %08x\n", itf->addr_refid);
+  printf("addr_refid = %08x (%d)\n", itf->addr_refid,
+         itf->addr_refid);
 	  printf("num_mcast = %d\n", itf->num_mcast);
 	  printf("received = %ld\n", itf->received);
 	  printf("sent = %ld\n", itf->sent);
Merging Changes
We’ve just finished up a quick overview of changeset history by using revtool, and we saw how easy it was to pull in changes from another repo that merged without a problem. But now let’s see what it’s like to pull in changes that don’t merge so nicely.
Pulling and Resolving a Conflict
We’ve changed some code in our repo and made a small commit with our changes. We can see from the history what our changes look like, and now we’re ready to move on and keep working. But now we find out that we need to pull some code from another repo. Someone else has done some work, and we need to merge their changes into our work before we keep going.
Most often when changes are pulled into your repo, BitKeeper will auto-merge the changes without a hassle. But sometimes you pull changes from another repo that touch the same files in the same areas as ones you have changed. This creates a conflict that BitKeeper doesn’t know how to solve, so it relies on you to merge the conflict by hand. Let’s pull in a change from another version of our demo repo that will cause a conflict and see how that is resolved.
$ bk pull http://bkbits.net/u/bkdemo/bk_demo2
Pull http://bkbits.net/u/bkdemo/bk_demo2
  -> file:///home/lumbergh/bk_demo_copy
 [pull]                            100% |==============================|
Conflicts during automerge of ntpd/ntp_io.c
resolve: 1 unresolved conflicts, starting manual resolve process for:
	 ntpd/ntp_io.c
 [resolve]                         100% |==============================|
(content conflict) ntpd/ntp_io.c>>
BK has run into a conflict while merging the new changes, and it doesn’t know how to resolve it, so it has dropped us into the resolver. It’s waiting on us to decide what to do. If we press Enter at this prompt, we’re given a list of available commands.
(content conflict) ntpd/ntp_io.c>> <press enter>
---------------------------------------------------------------------------
File:   ntpd/ntp_io.c

New work has been added locally and remotely and must be merged.

GCA:    1.403
Local:  1.404
Remote: 1.403.1.1
---------------------------------------------------------------------------
Commands are:

  ?    - print this help
  !    - escape to an interactive shell
  a    - abort the patch, DISCARDING all merges
  cl   - clear the screen
  C    - commit the merged file
  CC   - commit the merged file with comments
  d    - diff the local file against the remote file
  D    - run side-by-side graphical difftool on local and remote
  dl   - diff the GCA vs. local file
  dr   - diff the GCA vs. remote file
  dlm  - automerge (if not yet merged) and diff the local file vs. merge file
  drm  - automerge (if not yet merged) and diff the remote file vs merge file
  e    - automerge (if not yet merged) and then edit the merged file
  f    - merge with graphical three-way filemerge
  f2   - merge with graphical two-way filemerge
  h    - revision history of all changes
  hl   - revision history of the local changes
  hr   - revision history of the remote changes
  H    - show merge help in helptool
  m    - automerge the two files
  p    - graphical picture of the file history
  q    - immediately exit resolve
  s    - merge the two files using SCCS' algorithm
  sd   - side-by-side diff of the local file vs. the remote file
  ul   - use the local version of the file
  ur   - use the remote version of the file
  v    - view the merged file
  vl   - view the local file
  vr   - view the remote file
  S    - skip this file and resolve it later
  x    - explain the choices

Typical command sequence: 'e' 'C';
Difficult merges may be helped by 'p'.
Merging a file
Now we need to merge the changes. In our case, we want to step into the 3-way merge tool and do our merge graphically from there. Type f and press Enter and BitKeeper will fire up fm3tool to do the merge.
Let’s take a look at fm3tool:
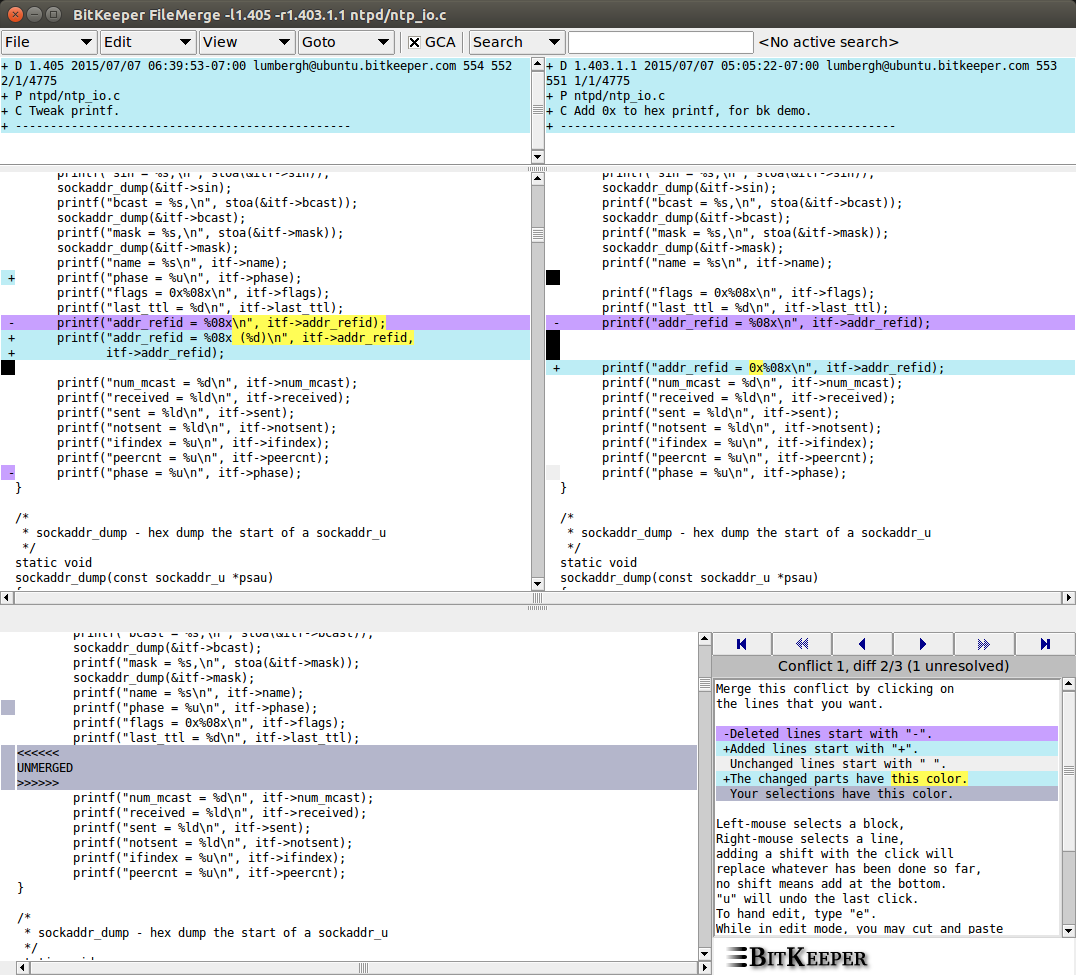
Whew! That’s a lot of stuff for one window! Let’s start at the top and work down. The top row shows the two changeset comments side by side so that you can see what you are working with. The row below that has two text windows showing a side-by-side diff of the changes. We can see that fm3tool has already moved us to the conflicting change in our merge, and the conflicting pieces are highlighted in yellow.
Down in the lower window you can see the result of our merge, and it currently has a big chunk marked UNMERGED. This is showing us the conflict and where in the file it needs to be merged. We’ll merge our changes by selecting the pieces we want from each cset. This is also where we can jump into the file and edit the changes by hand if we want, but we won’t be doing that today.
So, someone has changed the same printf that we changed in our commit. We need to look at the two changes and figure out how to reconcile them. Our changes are on the left, and the changes we’re pulling in and trying to merge are on the right. It looks like our changes are the ones we want, so we want to execute the merge such that our changes are taken over the new changes we’re pulling in.
Let’s pick a change on the right first to see what happens. Click the right window on the line with 0x highlighted in yellow.
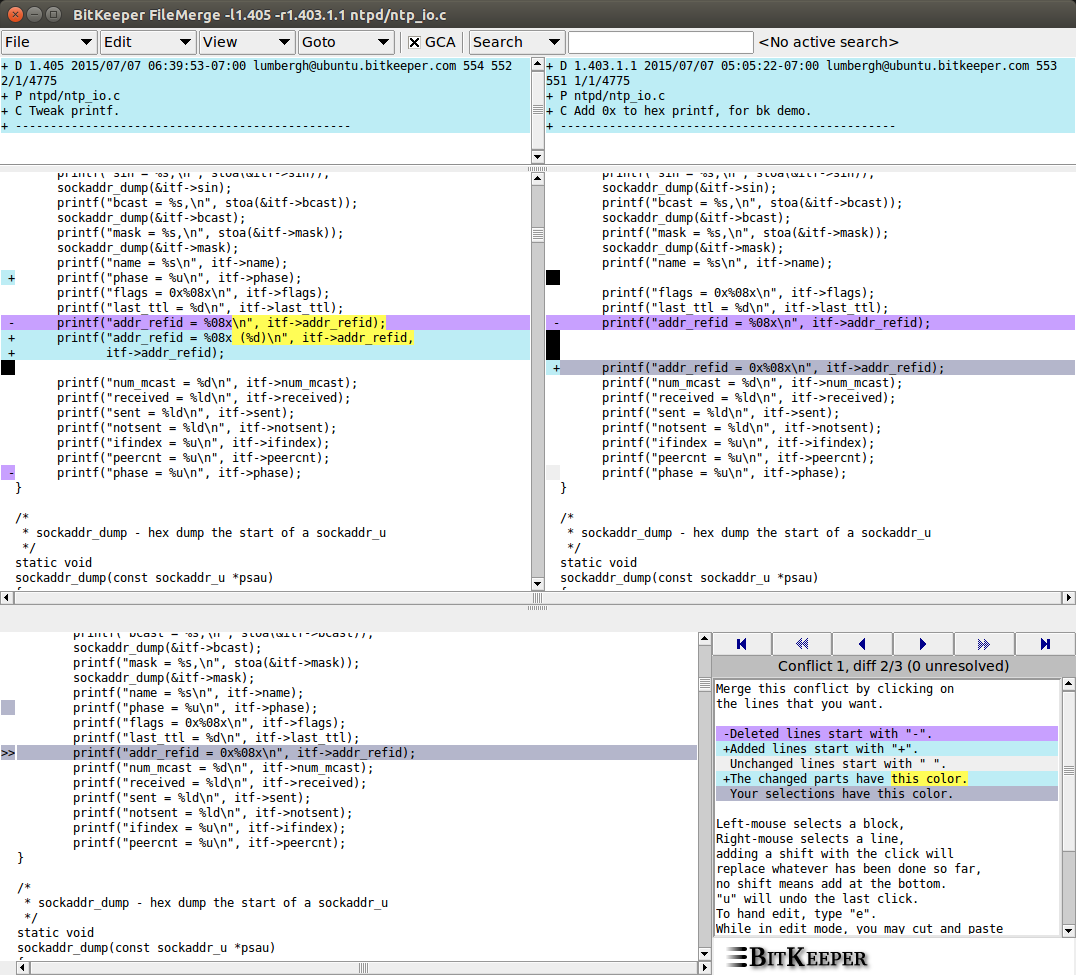
You’ll see that line appear in the lower window where the UNMERGED block used to be. We’ve now resolved the first conflict, but we didn’t actually want that line, we wanted the other line. So type u to undo that and move the conflict back to an UNMERGED state. Now click in the left window on the line with our changes to the printf highlighted in yellow.
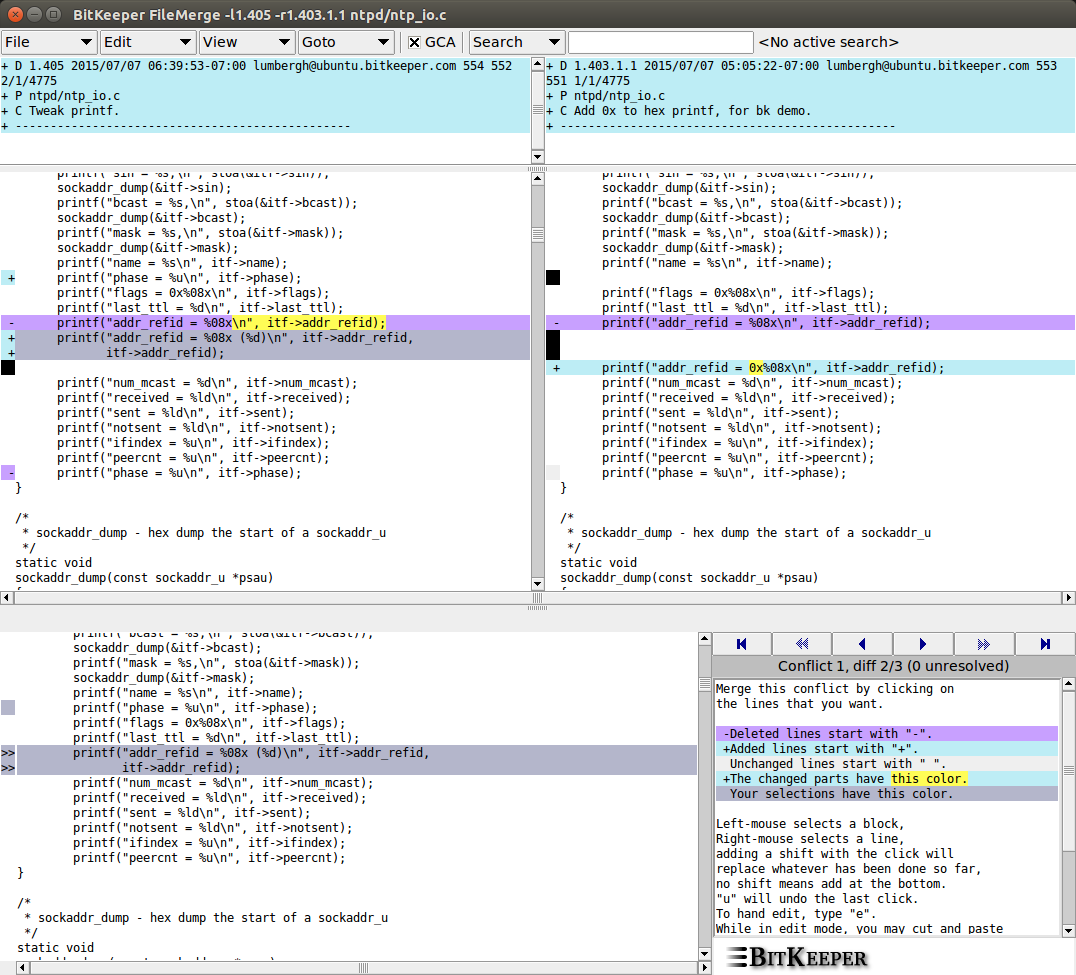
That puts our change down in the lower window in place of the UNMERGED block. Looks good.
We’re almost done! If there had been other conflicts, we would navigate to each of them resolve each one in the same way.
Now type s to save changes and exit the fm3tool.
Committing a Merge
We’ve just pulled and merged a conflict from another parent repo, and now we’re ready to commit our merge. BitKeeper has dropped us out of the fm3tool and back to the resolver prompt. Now type C and press Enter to commit the merge.
(content conflict) ntpd/ntp_io.c>> C
pull                                 1 changeset,    2 merges in   2 files
This will commit our merged changes. Citool will pop up to show us our merged changes. We can see the changes we made to ntp_io.c, and it looks like the ChangeSet already has a comment. Let’s make a comment for ntp_io.c. You can use the comments to explain what you did with the merge, or you can just type "Merged".
BitKeeper has already filed in a simple comment stating what happened. We pulled bk_demo2 into our bk_demo_copy and merged the two. You can take the time to write in your own merge comments here, but the standard merge comments are useful for noting the difference between a merge and a regular commit when looking through the change history. So it’s customary to leave these defaults comments at the beginning. You add aditional comments at the end.
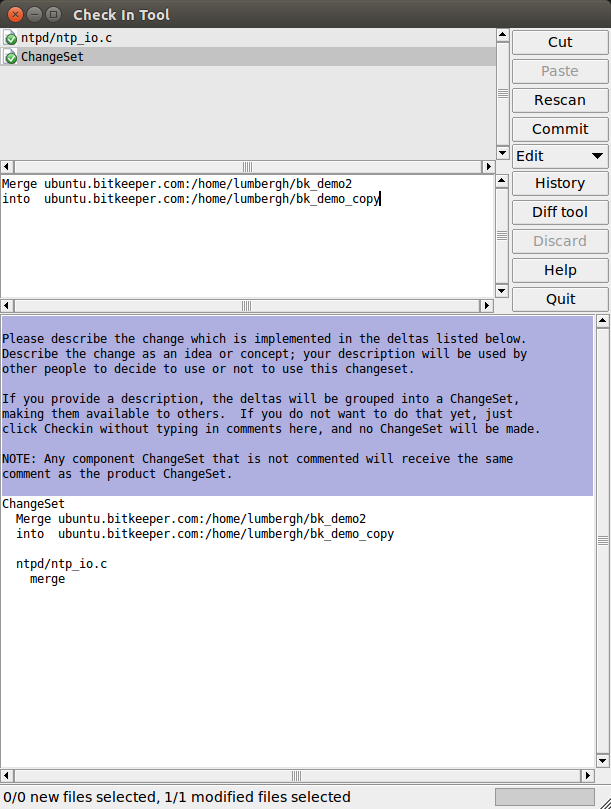
Click the Commit button twice and then we’re done resolving the conflict.
Pushing Changes Back to the Parent
We committed a merge to our repo, and now we’re finally ready to push our changes back upstream to our parent repo. But before we do that, let’s make sure our parent doesn’t have any changes we need to pull first. BitKeeper will not let you push your changes to a repo that has any changesets you don’t already have, so we need to check for any changes before we push. Note that BitKeeper will stop you from doing the push if there are changesets you need to pull, so you don’t absolutely have to check for them, but it’s good practice to do it.
$ bk changes -R
==== changes -R file:///home/lumbergh/bk_demo ====
The -R option means to list any remote changes in the parent that we don’t already have in our repo.
Conversely, the -L option shows us what changes are local changes that we’re can push to our parent.
$ bk changes -L
==== changes -L file:///home/lumbergh/bk_demo ====
ChangeSet@1.3531, 2015-07-07 06:49:04-07:00, lumbergh@ubuntu.bitkeeper.com
  Merge ubuntu.bitkeeper.com:/home/lumbergh/bk_demo2
  into  ubuntu.bitkeeper.com:/home/lumbergh/bk_demo_copy
  MERGE: 1.3528.1.1

ChangeSet@1.3530, 2015-07-07 06:39:53-07:00, lumbergh@ubuntu.bitkeeper.com
  Our first BK changeset. Tweaked a printf.

ChangeSet@1.3528.1.1, 2015-07-07 05:05:22-07:00, lumbergh@ubuntu.bitkeeper.com
  Add 0x to an interface_dump() printf, for bk demo.

ChangeSet@1.3529, 2015-07-07 05:01:38-07:00, lumbergh@ubuntu.bitkeeper.com
  Tweak some debug in interface_dump().
These are the changes we have that our parent does not have yet. This will include the changes we pulled earlier from http://bkbits.net/u/bkdemo/bk_demo1 as well as the changes we made ourselves, including the work we did in resolving the merge conflict when we pulled from http://bkbits.net/u/bkdemo/bk_demo2.
Let’s push those changesets back to our parent: bk_demo.
$ bk push
Push file:///home/lumbergh/bk_demo_copy
  -> file:///home/lumbergh/bk_demo
push                               100% |==============================| OK
And we’re done! Well, it looks like that’s it for our test drive. Now that you have an idea of how BitKeeper works, you should poke around at some of the rest of the options and see all that you can do.
You can read the A Guide to Merging with BitKeeper, or the Tips & FAQs. Or type bk helptool and read through some of the docs if you want to learn more about some of the commands.
If you run into any problems, drop us a line at support@bitkeeper.com and let us know. We’re happy to help!
Extra Credit Work
This section is not part of the basic testdrive but is meant to expand on a few of the topics mentioned throughout it.
Checkout Modes
A quick word about checkout modes.
By default, BitKeeper operates in a "edit" checkout mode. This means the files are editable and ready to go. This is the default for most users and should probably remain unless you have larger repos and are experiencing some performance issues. In that case, you might consider "checkout: get".
Available Checkout Modes
- checkout: get
-
In get mode, BK will automatically checkout each file in read-only mode (using bk co <file>) after doing a checkin.
- checkout: edit
-
In edit mode, BK will automatically checkout each file in read-write mode (using bk edit <file>) after doing a checkin.
- checkout: last
-
In last mode, BK will preserve the state of the file before checkin.
- checkout: none
-
In none mode, BK will clear the file after doing a checkin. This is the default.
File and ChangeSet Comments
A quick word on comments. Unlike some source control management systems, BitKeeper requires per-file and per-cset comments. That is, each file in a changeset needs a comment as well as an overall comment for the changeset itself. Generally speaking, your per-file comments are meant to describe the actual change to that file and maybe some detail about what was changed. The changeset comment is more a summary of the overall change being committed. You will see more of why this is a good thing when we start looking back at the revision history through revtool.